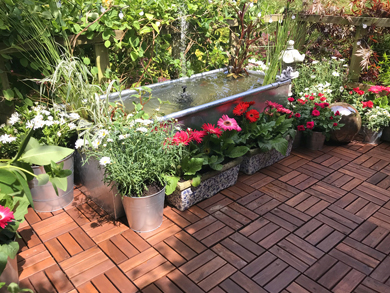
Learn how to make your own DIY planter with a stock tank.
It’s summer, which means your yard is full of life with an abundance of fresh vegetables and sweet-smelling flowers. Your yard looks beautiful, yet you can’t help but feel that it needs something to really make it pop. Have you ever considered using a stock tank as a planter? Whether you’re a newbie to the gardening world and want to expand, or you’re an experienced gardener who wants to add some dimension to your garden, this easy DIY project can add a cute and rustic element to your yard. Plus, it can provide you with extra space to plant your favorite vegetables and flowers.
Follow these step-by-step instructions to create your very own stock tank planter. It's easy and aesthetically pleasing to the eye; plus, it allows you to have more control over the quality of soil used to nourish your plants.
Materials:
- Plants
- Stock Tank
- Wire Mesh
- Drill/Drill Bit
- Gravel
- Galvanized Compound
- Planting Soil
- Wheels (optional)
- Cardboard for Insulation (optional)
Making the Planter
Step 1: Choosing Your Stock Tank
The fun thing about stock tank planters is that you can get creative. Stock tanks come in many sizes, shapes, and depths, so you have the opportunity to choose a tank that caters to the type of plants you will be planting, as well as what fits and looks good in your yard.
For ever-green plants and larger-scale vegetables like tomatoes, artichokes, and rhubarb, you will want a soil depth of 2-3 feet. For edible plants, herbs, and flowers, you will only need a soil depth of around 1 foot.
Step 2: Drill Drainage Holes
Turn over your stock tank and use a quarter or half-inch metal drill bit to drill several drainage holes along the bottom. A good rule of thumb is to drill two holes per every square foot of bottom.
Spray the holes with a galvanized compound to keep them from rusting. An optional step would be to place wire mesh at the bottom of the stock tank to keep your soil from running out through the holes.
Step 3: Positioning Your Stock Tank
Find a place in your yard where you would like to keep your planter, but make sure that it’s in an area that fits the sunlight criteria of your plants.
Place a layer of gravel in the area you’ll be positioning your stock tank to ensure proper drainage. You can also prop up your tank using cinder blocks or four-by-fours to facilitate drainage, but make sure that whatever product you use can hold the tank without collapsing.
Step 4: Filling the Tank
Before you fill the tank with soil, you can add fillers to the bottom of the tank, which will help ensure proper drainage and make the tank lighter. Using fillers also saves money by preventing you from having to fill the entire tank with soil. Filler materials can be gravel, pottery shards, packing peanuts, or even plastic bottles. Once the fillers are in place, you can then add the soil.
When adding fillers, it’s important to consider the soil level your plants will need to grow successfully. You don’t want to add too much filler and then find out that you don’t have enough space for the proper amount of soil.
Step 5: Planting and Watering
Plant your preferred seedlings or seeds in the soil, keeping in mind their mature size and height. You want to make sure that you place your plants in an arrangement where smaller plants won’t get shaded by larger plants once they reach maturity.
You’ll want to make sure you keep the soil consistently watered; much like raised beds, stock tank planters dry out much quicker than gardens that are in the ground. Setting up a drip irrigation system can save you some work when it comes to watering your planters, but hand-watering can work just as well if done consistently.
Optional Steps
- If you want to move your planter, you can install wheels on the bottom of your stock tank for easy mobility. Screw two boards to the bottom of the tank, one on each end, and then screw two wheels onto each piece of wood.
- If you live in a warmer climate or intend to keep your tank in full sunlight, you can add a layer of insulation to the interior walls of the tank. This will ensure that the roots of your plants do not get burned or damaged by the hot sides of the metal tank. You can use pieces of carpeting or cardboard to fulfill this task.
- Feel free to paint the sides of the tank in any design you’d like to add a creative touch to your planters.
You now have your very own stock tank planter that will add that extra touch to your backyard garden!